

Assessing Risks and Regulations Before Painting Over Lead Paint
To safely paint over lead paint, first confirm the surface is intact and stable, then set up plastic containment, use wet preparation methods to avoid dust, apply an approved encapsulant or high-grade coating, and finish with HEPA cleanup. Before picking up a brush, you must understand what lies beneath older layers of finish. Lead was added to residential coatings for durability, pigmentation, and moisture resistance until the federal government banned its residential use in 1978. As a result, older homes carry a high probability of containing hazardous materials:
- Nine out of ten homes built before 1940 contain lead-based paint.
- Two out of three homes built between 1940 and 1960 contain lead hazards.
- Roughly half of all homes built between 1960 and 1977 contain lead paint.
You can test surfaces using an EPA-recognized chemical swab kit, hire a certified lead inspector, or simply presume that any pre-1978 painted surface contains lead.
Disturbing these surfaces without proper controls generates invisible, toxic microscopic dust. Ingesting or inhaling this dust exposes children to severe neurological damage, developmental delays, and behavioral issues. In adults, chronic exposure contributes to cardiovascular disease, high blood pressure, and kidney damage.
To mitigate these severe hazards, the federal government established stringent regulatory frameworks. The EPA Renovation, Repair and Painting (RRP) rule and HUD lead hazard control standards govern activities that disturb painted surfaces in pre-1978 structures. Following lead paint safety protocols is critical because EPA enforcement penalties can reach $37,500 per violation, per day for uncertified contractors who disturb target housing. Furthermore, property owners and landlords must adhere to mandatory lead paint disclosure laws, alerting prospective buyers and tenants to any known lead-based hazards.
| Strategy | How It Works | Expected Lifespan | Best Used For |
|---|---|---|---|
| Regular Paint | Covers existing intact layers with standard acrylic or oil paint | 3–5 years (Interim control only) | Low-traffic, stable interior walls and ceilings |
| Lead Encapsulants | Applies a thick, elastomeric liquid barrier formulated to bond and seal lead | 10–20+ years (Approved interim control) | Undamaged trim, walls, and structural elements |
| Full Lead Abatement | Permanently removes paint via chemical stripping, heat stripping, or component replacement | Permanent (20+ years) | Deteriorated surfaces, window troughs, friction jambs |
When Painting Over Lead Paint Is Safe vs Unsafe
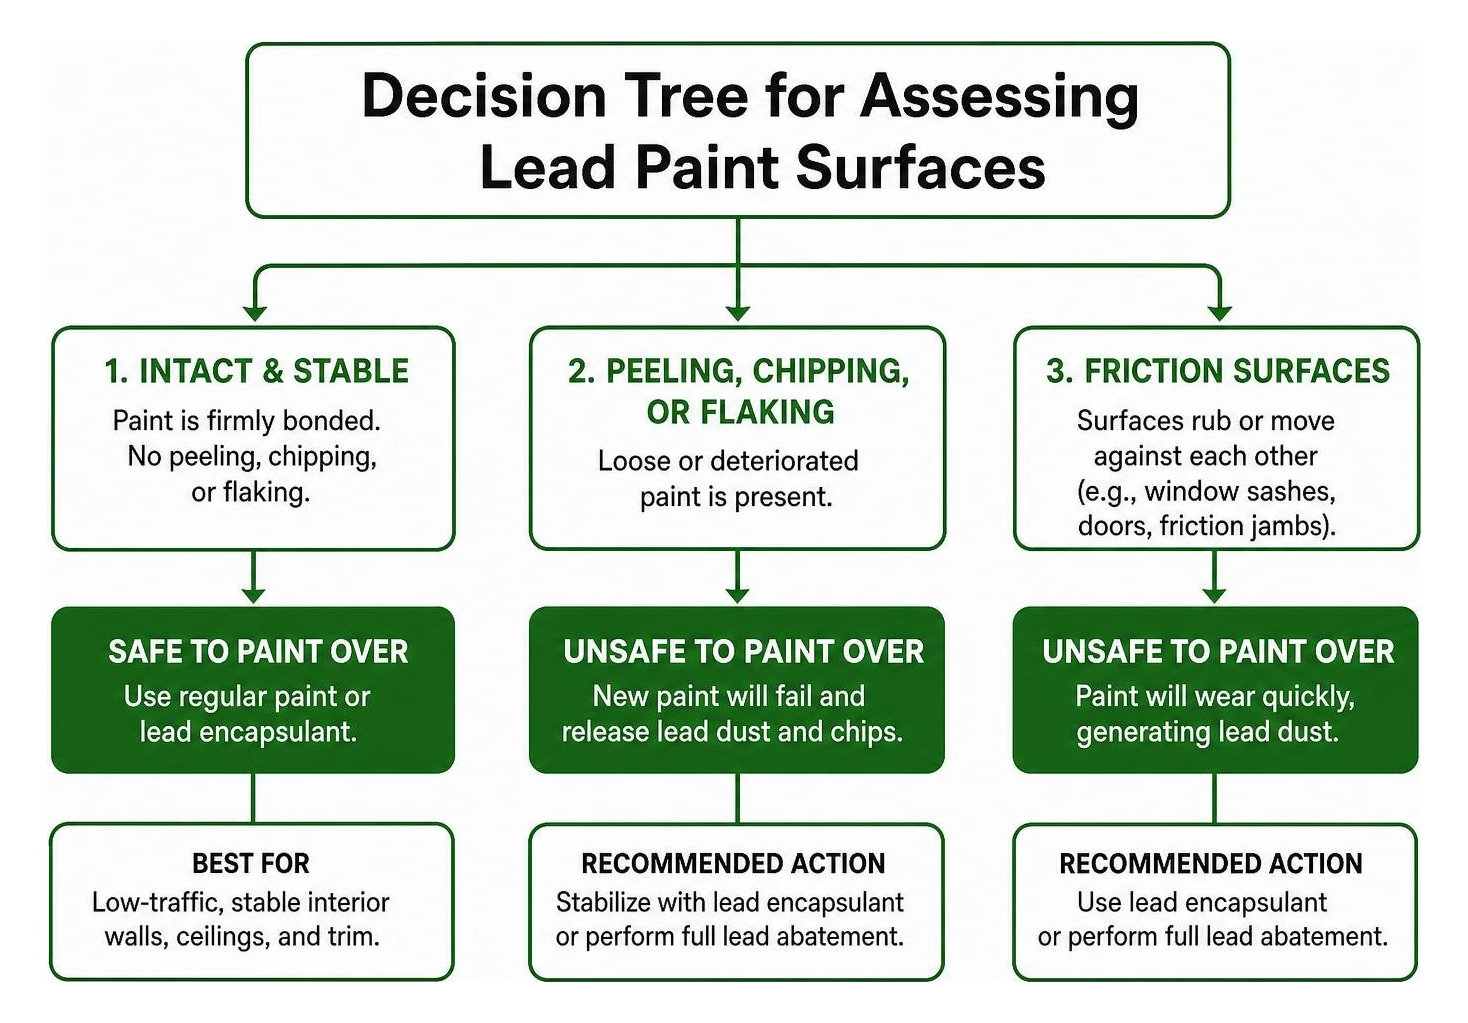
Painting over lead-based coatings is an interim control, not a permanent hazard elimination method. Applying fresh paint or liquid encapsulants is safe only on intact, stable surfaces with zero structural moisture issues.
Covering old coatings fails under specific conditions:
- Peeling, Chipping, or Flaking Surfaces: New paint cannot adhere to a failing substrate. Applying topcoats over loose paint seals in air pockets, causing rapid delamination and releasing lead chips.
- Friction and Impact Surfaces: Window sashes, window sills, door jambs, stair treads, and cabinet drawers rub together during normal operation. This friction grinds paint layers into fine lead dust continuously.
- Moisture-Damaged Substrates: High humidity or exterior leaks cause wood rot and plaster breakdown, destroying paint adhesion from the inside out.
When evaluating lead abatement vs encapsulation, severe friction points or failed substrates require full component replacement or abatement rather than simple repainting. Understanding the baseline condition of your lead based paint determines whether a coating application is viable.
Regulations on DIY Work vs Hiring Certified Professionals
Federal regulations draw a sharp legal line between uncompensated homeowners and paid professionals:
- Uncompensated Homeowners: If you own and occupy a single-family home, federal RRP rules do not legally prohibit you from performing your own DIY painting. However, following federal EPA Lead-Safe Renovation, Repair and Painting guidance remains vital to prevent poisoning your household.
- Paid Contractors and Property Managers: Anyone performing renovation, repair, or painting for compensation in pre-1978 housing or child-occupied facilities must maintain active lead paint certification compliance. Firms must be certified, and individual workers must complete an accredited 8-hour training course.
Before beginning work, contractors must distribute the official EPA Renovate Right guidelines pamphlet to property owners and occupants. Understanding how professionals handle older homes with lead-based paint ensures that projects meet regulatory standards and safeguard public health.
Step-by-Step Guide to Safely Painting Over Lead Paint

Executing a safe paint project requires a contained workspace to isolate hazardous dust. Never begin preparation without setting up strict physical boundaries and donning appropriate Personal Protective Equipment (PPE).
Containment Protocols:
- Interior Work: Lay heavy-duty 6-mil polyethylene plastic sheeting over the floor extending at least 6 feet in all directions from the work area. Seal all seams to baseboards using painter’s tape.
- Exterior Work: Extend plastic sheeting at least 10 feet from the building foundation. If working near a property boundary or on multi-story projects, erect vertical plastic containment walls.
- HVAC Isolation: Turn off forced-air heating and cooling systems. Seal all intake and exhaust vents within the room using 6-mil poly sheeting and duct tape.
- Entry Barriers & Signage: Hang protective plastic flap doorways over access points to prevent dust migration. Post warning signs at every entrance in the primary language of the occupants warning: “Warning: Lead Work Area. Poison. No Smoking or Eating.”
Required PPE:
- Respirators: NIOSH-approved N100, R100, or P100 particulate filtering respirators. Standard dust masks provide zero protection against microscopic lead particles.
- Protective Clothing: Disposable Tyvek coveralls with integrated hoods and shoe covers.
- Eye & Hand Protection: Non-vented safety goggles and heavy-duty nitrile gloves.
Surface Preparation and Containment for Painting Over Lead Paint

Proper surface preparation prepares the surface for paint adhesion without releasing toxic dust into the air. Traditional dry sanding or open scraping must never be used on lead-painted surfaces.
Follow these safe preparation practices:
- Mist Before Scraping: Fill a spray bottle with water (optionally mixed with a mild detergent) and thoroughly mist all target surfaces. Keep the paint damp while using a flat-blade hand scraper to remove loose or flaking edges.
- Wet Sanding & Chemical Deglossing: Smooth down ridged edges using wet-dry sandpaper dipped in water, or apply a liquid chemical deglosser to etch glossy enamel without generating airborne particulate matter.
- HEPA-Shrouded Power Tools: If using power sanders, ensure they feature sealed manufacturer shrouds connected directly to an industrial HEPA vacuum exhaust system.
- Adhere to Prohibited Practices: Federal lead safety rules strictly forbid open-flame burning/torching, using heat guns operating above 1,100°F, uncontained hydro-blasting, and dry power sanding without HEPA shrouds.
Maintaining these protocols is essential to keeping a lead safe home during active surface prep.
Safe Coating Application, Cleanup, and Verification
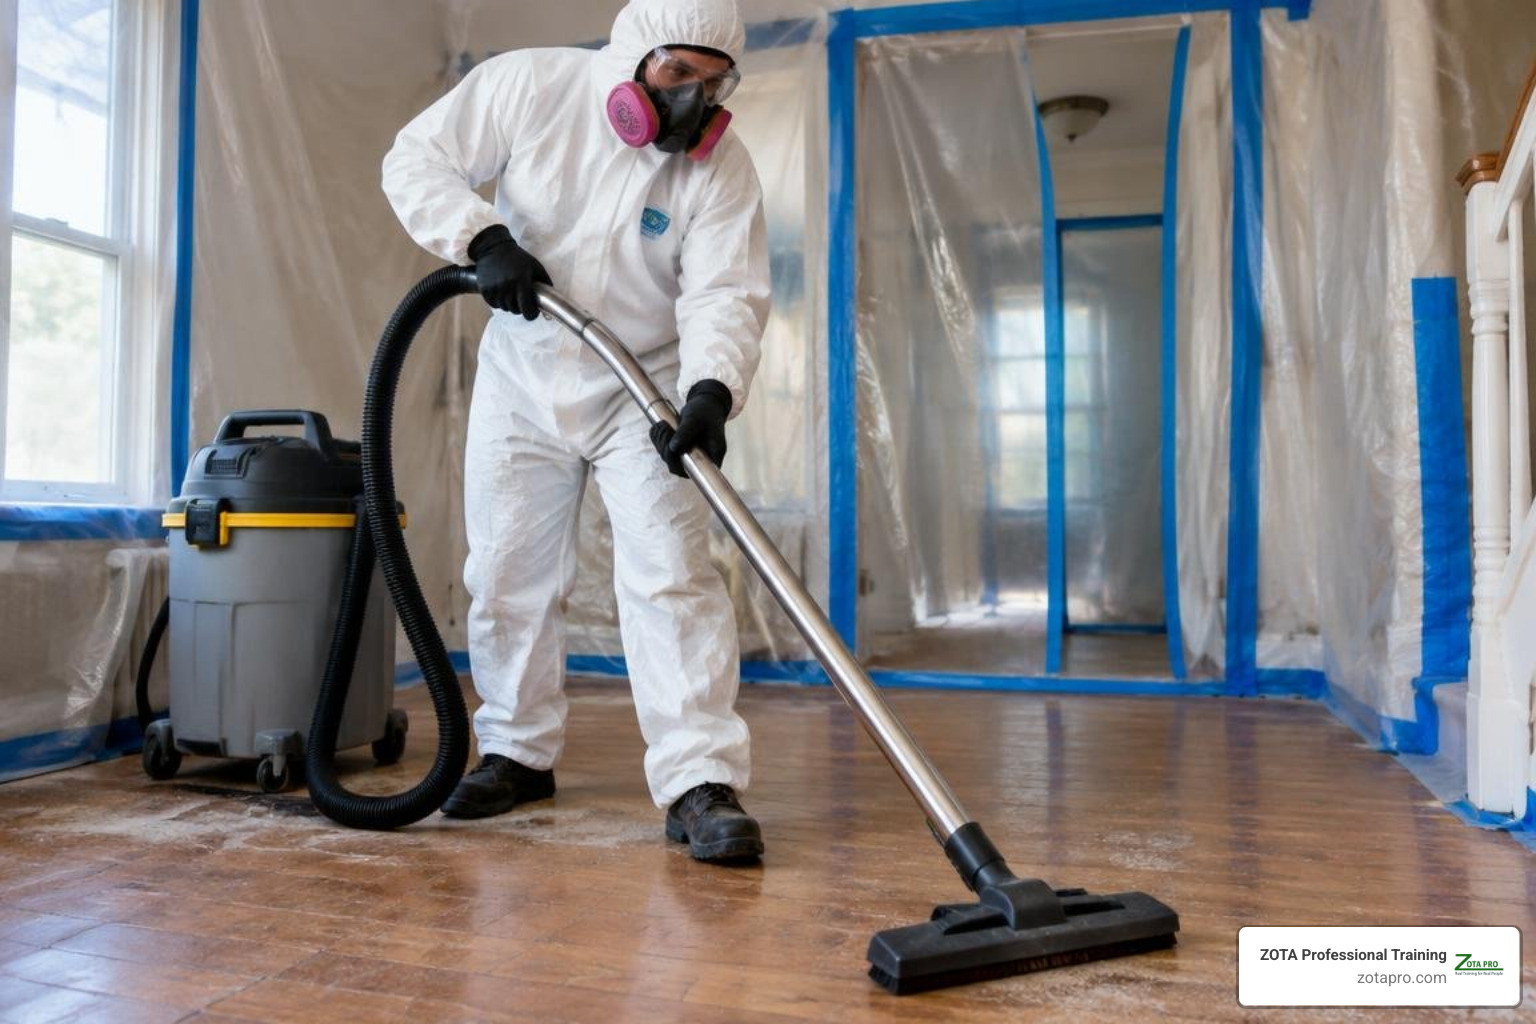
Once preparation is complete and the substrate has dried, apply your protective coating:
- Approved Liquid Encapsulants: For long-term performance, apply a thick elastomeric encapsulant coating using a commercial airless sprayer or specialized roller according to the manufacturer’s required dry-film thickness (mils).
- High-Grade Acrylic Topcoats: If applying standard architectural paint as an interim control, use two heavy coats of premium 100% acrylic latex or oil-based enamel to encapsulate the underlying layers.
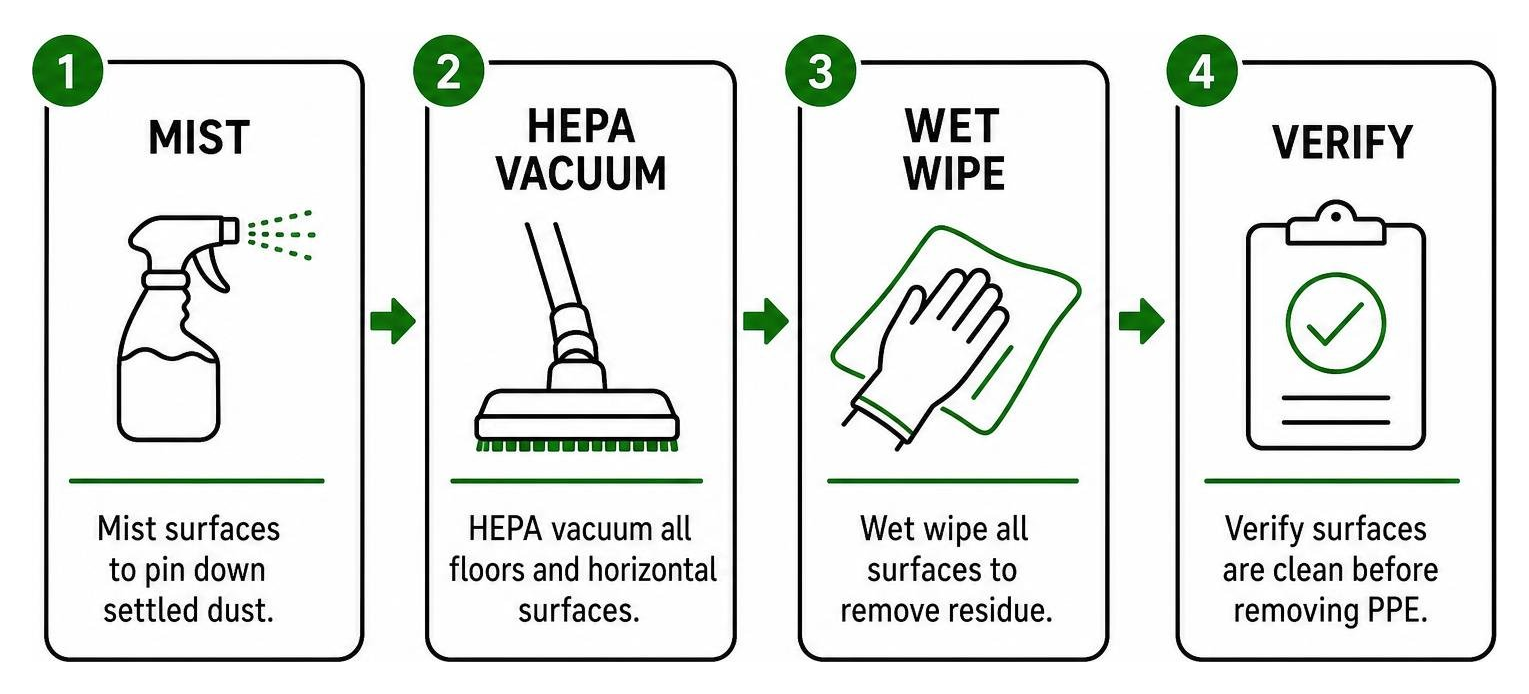
Final Cleanup and Verification:
- Mist and Fold Plastic: Mist the containment sheeting with water to pin down settled dust. Carefully roll the plastic inward, folding the dirty side onto itself.
- Double-Bag Waste: Seal all plastic sheeting, tape, scraper blades, and protective clothing inside heavy-duty 6-mil plastic trash bags. Double-bag the waste and seal with duct tape for proper solid waste disposal.
- HEPA Vacuuming: Vacuum all floors, window sills, and horizontal surfaces using a certified HEPA vacuum equipped with a motorized beater-bar attachment for carpets.
- Wet Cleaning: Clean all hard surfaces with disposable wet-wipes or a two-bucket mopping system using a specialized lead-specific cleaning detergent.
- EPA Cleaning Verification Protocol: Compare disposable cleaning cloths wiped along window sills and floors against an official EPA Cleaning Verification Card to confirm no visible dust remains.
- Dust-Wipe Clearance Testing: For high-assurance verification, hire an independent technician to collect professional dust-wipe clearance samples and verify safe lead thresholds before reoccupying the space.
For step-by-step guidance on advanced remediation projects, read our beginners guide to lead abatement safety.
Ready to ensure total compliance and protect your workforce? Explore ZOTA Professional Training’s EPA-accredited lead renovator certification courses to master lead-safe work practices today.